This is Part 2 of of my notes from the Pluralsight course “Extending PowerShell” by Matt Allford. As mentioned in part 1, these are just my notes that I took while reviewing the series again. These are in no way of replacing the course, and I highly recommend checking the course out. I hope you find something useful here that may encourage you to explore the PowerShell world.
Introduction
Exploring and working with new PowerShell Modules that are not installed by default.
Covering key components with working with the PS Package mgmt and repos.
- Finding and Installing Modules
- Updating Modules
- Removing/Uninstalling modules
- Offline Module installation
Understanding Package Management and Repositories
Linux uses YUM/Apt, etc to install and manage packages but that isn’t as easy on Windows. There is also brew for MacOS and Chocolatey for Windows that can be installed from a 3rd party. The Native windows Package Manager is built within PowerShell.
Should be keeping track of the software installed.
MS released PackageManagement (Formally called OneGet)
The PackageManagement Feature is an aggregator – Installed, update and uninstalled
Comes with a set of PowerShell Cmdlets
There are 4 pillars that make up the PackageManagement architecture.
- End User: this is the interface in which we enter our actions to interact with the PackageManagement Core
- PackageManagement Core: provides the functions of running the Discovery, Install/Uninstall and Maintaining an inventory of the packages.
- PackageManagement Providers: The PackageManagement Framework provides and extensible plugin model tat allows for different installer platforms toplug into the framework. These are PowerShellGet, MSI, MSU, Program and NuGet by default. However, there is also 3rd party such as Python, AppX and PHP, plus more.
- Package Sources: This is the source\repository location of where the Package Providers will pull the package from. E.g. PowerShell Gallery.
PowerShellGet.
Package Management Provider: One of the most common Package management providers, it is used to mange PowerShell modules, scripts and DSC resources.
Core functions – Discover, Install, Update and Publish. Packages.
It will target the PowerShell Gallery by default, and online repository, but you can also change the location.
It is available in Windows 10+, Server 2016+, PowerShell 6+ or WMF 5.1 +. It also required PowerShell 3.0+ and .NET Framework 4.5+.
PowerShell Repositories
Are a central location to share, store and Search for PowerShell content, this is a location that you would publish your PowerShell modules to in order to easily access . Also good to place your scripts.
Use PowerShell Get to find new repositories, install, update and Publish modules to the PowerShell repo.
Repos can be public and private.
PowerShell Gallery is the most widely used Repository.
DEMO: Working with Package Management and Repositories
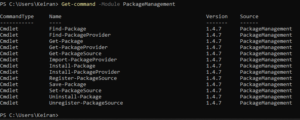
When running Get-Command -Module PackageManagement you will see a list of cmdlets that will search, install and uninstall packages through the Package Management Framework
Running Get-PackageProvider will display the currently configured Package Providers – when running in PowerShell 7, you may only see a couple of providers, but if you run it in an earlier version, you should see several more. This is because PowerShell 7 may not support the other Package Providers by time of this writing.
![]()
PowerShellGet is the most common, however NuGet is new in PowerShell 7 and is the default PackageManager for the .NET framework.
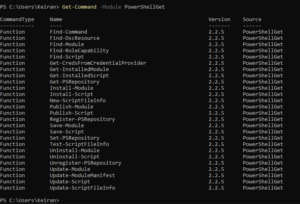
Running Get-Command -Module PowerShellGet will display all the PowerShellGet commands that are available, this will also include Alias’ and Functions.
Running Get-PSRepository will return results for the repositories set up to install and save modules and scripts to. By default, PowerShell Gallery is set and is untrusted. When you run a request against the PowerShell Repo, you will be required to accept or decline if you trust the source. You can add other Public and Private repositories.

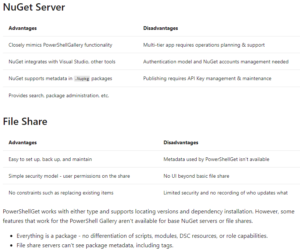
For Private repositories, you can take a look at this article from Microsoft: Working with Private PowerShellGet Repositories, Outlined are two types of repositories you can deploy for Private usage. NuGet and File Share. There are a list of Advantages and Disadvantages.
Create a new Local Repo
Example from the course:
Run New-Item -Path C:\LocalPSRepo -ItemType Directory
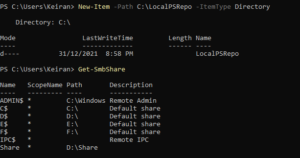
From there you can create a new SMB Share on that folder by running
New-SmbShare -Name LocalPSRepo -Path C:\LocalPSRepo\
**Remember back in part 1 we discussed about Auto Loader. Here we have not manually imported SmbShare, however, autol oader has found the module and loaded it for us.
Run a Get-SmbShare again to see the new share added.
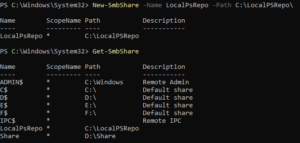
To register the repository as a default repository and trusted, you can run the below command, this will set up the source location and the script source location for the private repository.
The -Name does not need to be the same Name as what you have called the share.
The -InstallationPolicy will set whether the repository is trusted or not.
Register-PSRepository -Name <name> -SourceLocation <unc path> -ScriptSourceLocation <unc path for scripts> -InstallationPolicy <trusted/untrusted>
Register-PSRepository -Name LocalPSRepo -SourceLocation \\localhost\LocalPSRepo\ -ScriptSourceLocation \\Localhost\LocalPSRepo\ -InstallationPolicy Trusted
Run a Get-PSRepository again and you will see the Repository added. This will now allow the PowerShellGet provider to search through this new repo to find modules and scripts as well as still searching the PowerShell Gallery.
![]()
To set the PSRepository from Untrusted to Trusted or Trusted to Untrusted, you can do this by running the below:
Set-PSRepository -Name PSGallery -InstallationPolicy <Trusted/Untrusted>
For configuring a NuGet.Server, See https://docs.microsoft.com/en-us/nuget/hosting-packages/nuget-server
DEMO: Finding and Installing Modules
A useful tool is the Find-Module command, which will help find certain modules. There are no required parameters, but you can use such parameters as -MinimumVersion, -MaximumVersion, -RequiredVersion and -AllVersions.
The –IncludeDependencies will display a list of other modules that are required for the module to function correctly. When you go to install the module, the other dependencies should also be installed with the module at the time, you can however go ahead and install those dependencies separately.

Running Find-Module on its own will return results for the latest versions of all modules available in the set PS Respositories.
Running Find-Module -Name *<name>* will search and return results that include the name in wildcard form.
Running Find-Module -Tag <name> will send back results with the tag that is referenced for a module.
**By default, the latest version will be returned. If you run the -AllVersions will display all available versions to find a specific number to install.
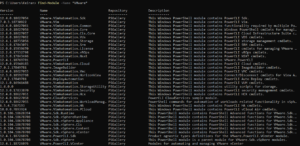
Alternatively, running Find-Command -ModuleName <module name> will display all the commands within that module, this will help when choosing if the module is the required module.
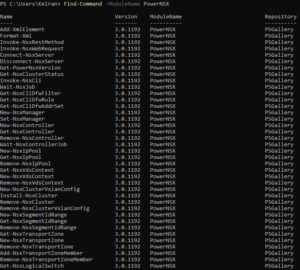
You can also drill down to find which module a specific command is located. Find-Command -Name <Command> will return a list of modules containing that command.
![]()
Running Install-Module -Name <Name> will install the module without any other parameters. However, there are a few parameters that are available, such as the minimum and maximum versions.
The -AllowClobber will give you the option to install a module even if the commands conflict with an already installed module.
-Scope defines the location in which the module is to be installed to, setting as CurrentUser will place the module in a path on the CurrentUser will be able to access (as available in the Environment Variable path) whereas setting the -Scope to AllUsers will place it in a default location that is, of course, available to All Users.
Depending on the version of PowerShellGet, the default scope for the module will be determined by the version that is installed.
PowerShellGet V1 = All Users (Preinstalled with Windows 10)
PowerShellGet V2 = CurrentUser (Installed as part of PowerShell 7)
The newest version will be used by default.

To install a module, it is as simple as running Install-Module -Name <name>
Alternatively you can install to an alternate scope, however, if you do not have elevated privileges, you will receive the below error, and will not be able to install to the AllUsers default location.
![]()
Run the command on it’s own and it will go to the default scope, CurrentUser.
As the repository is untrusted, you will receive a prompt requesting if you would like to trust the repository. It will also advise you can set the InstallationPolicy against the repository.
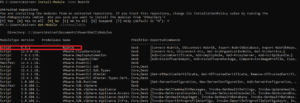

As a bonus. When installing a module that is the latest version and there is already a previous version available, you will receive a warning that there is already a version installed. The Warning will request if you would like the latest version installed side-by-side.

Update modules
From time to time authors will keep their modules up to date, and it is best to update them to get patches and features related to issues running a cmdlet or new functionality.
To force the installation of an older version, you can run Install-Module -Name <name> -RequiredVersion <version>
To update this to a specific version, and not the latest, run Update-Module -Name -RequiredVersion <version>
** Updating a Module does not remove the previous version. This must be removed by using the Remove-module command.
When not specifying a version parameter, the latest version will be installed.
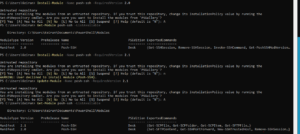
If the module was not installed by powershell, then Powershell will not be able to update the module as the PowerShellGet core does not have any record of it being installed.
Running (Get-Module).count will show the number of modules installed via the PowerShellGet framework. This will not show any that have been installed using another method.
Running (Get-module -ListAvailable).count will show all Modules installed on the computer and any that are were not installed using PowerShellGet.

Removing and Uninstalling Modules
Removing Module will remove the module from the session but not from being installed on your computer. It is the opposite of Import.
Uninstalling will remove the module from your computer = The opposite of using the Install-Module command.
Run Remove-Module -Name <name> to remove the module
The module is still installed and can be viewed by running Get-module -Name <name> -ListAvailable

![]()
When using Uninstall-Module the only required parameter is the -Name However, there is still the option to choose the version of the installed module. This is handy for when you update a previous version and need to clear out the older ones.
When running Uninstall-module -Name <name> (that’s not including a version) the latest version will be uninstalled and the lower version numbers will remaining. To remove all, then you will need to use the -AllVersions parameter
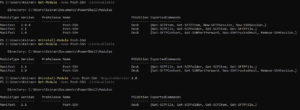
DEMO: Offline Module Installation
This is a method usually used in dark sites or air gapped sites that have strict security configurations, or require security teams to evaluate the modules before providing and marking them as approved modules.
Save-Module
This command can be used to download/save the module (Without installation) to a computer that is connected to the internet.
Save-Module can allow you to inspect the code of the module as you are not simply installing the module. The code is already pre-scanned in the PSGallery, but you can also inspect it yourself
You can still download using parameters for specific versions, but there are two required parameter. -Name and -Path. As you are not installing this and you are saving to copy to another location, you will need to specify a path.
Save-Module -Name <name> -Path <Path>
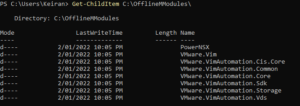
To install a module from an offline seed. The module should be copied to a default repository in the environment variable path. Once you know the location, you can run a Copy-Item -Path <Source> -Destination <Destination> -Recurse for the module to be located by the PowerShellGet Framework to detect
![]()


